Flutter SDK Setup
To integrate AppsOnAir AppSync Flutter SDK to your Flutter Apps, follow the below steps
- Make sure to configure the API key properly. For additional information Getting started
iOS Requirements and Setup
Requirements
-
iOS deployment target: 12.0
-
If
CFBundleDisplayNameis not added in your app then added in your app info.plist file.
<key>CFBundleDisplayName</key>
<string>YourAppName</string>
Android Requirements and Setup
Requirements
-
JAVA 11 required
-
An Android 7.0+ device or emulator.
-
Project using AndroidX.
-
compileSDKVersion set to 34 or higher.
-
Targets API level 24 (NOUGAT) or higher
-
Android Gradle Plugin (AGP): Version 8.0.2 or higher
-
Gradle version 8.0 or higher
-
Kotlin Version 1.7.10 or higher
-
Uses Jetpack (AndroidX), which includes meeting these version requirements:
compileSdkVersion34 or later
-
Set up a physical device or use an emulator to run your app.
-
Create or login to your AppsOnAir Account
-
Goto the your app details page -> App services tab -> API key tab to get your AppsOnAir services API Key
When creating a new project from Android Studio Artic Fox (or newer) the allprojects{...} is no longer added in the project level gradle.so need add in settings.gradle
android.useAndroidX = true
android.enableJetifier = true
Setup
Add the following code to settings.gradle
- Groovy
- Kotlin
pluginManagement {
   repositories {
       google()
       mavenCentral()
       gradlePluginPortal()
       maven { url 'https://jitpack.io' }
   }
}
pluginManagement {
   repositories {
       google()
       mavenCentral()
       gradlePluginPortal()
       maven("https://jitpack.io")
    }
}
Add below code to your root level build.gradle
- Groovy
- Kotlin
allprojects {
   repositories {
       google()
       mavenCentral()
       maven { url 'https://jitpack.io' }
   }
}
allprojects {
   repositories {
       google()
       mavenCentral()
       maven("https://jitpack.io")
    }
  }
Add required code
- Add meta-data to the app's AndroidManifest.xml file under the application tag.
- Make sure meta-data name is “com.appsonair.icon”.
- Provide your application logo in meta-data value.
</application>
    ...
    <meta-data
            android:name="com.appsonair.icon"
            android:resource="@mipmap/ic_launcher" />
</application>
Create string.xml file in to android/app/resourse/value and add below code
<?xml version="1.0" encoding="utf-8"?>
<resources>
    <string name="app_name"> YOUR_APP_NAME </string>
</resources>
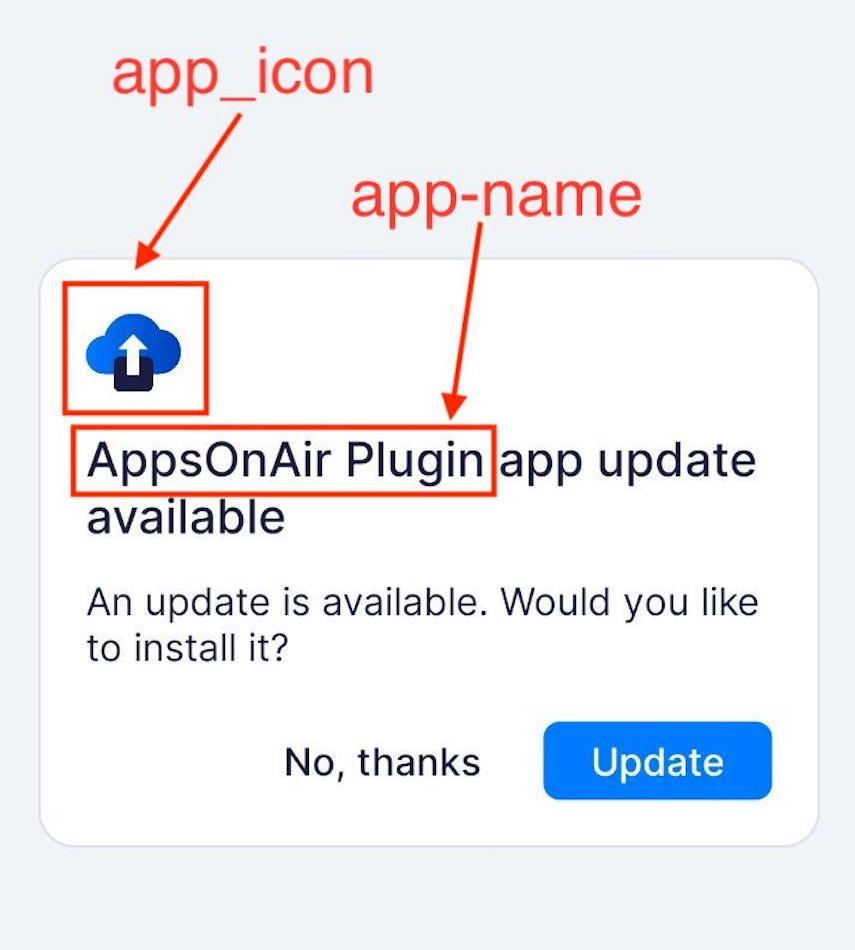
Also make sure to add app icon into drawable as app_icon
Add the AppSync Service in Flutter Code and Usage
Use of Package
- Dart
$ flutter pub add appsonair_flutter_appsync
Import it
Now in your Dart code, you can use:
- Dart
import "package:appsonair_flutter_appsync/app_sync_service.dart";
Call Service into initState, with Default Design
- Dart
@override
void initState() {
    AppSyncService.sync(context);
    super.initState();
}
Make sure that to call sync() method after MaterialApp!
Don't forgot to install pods! (for iOS)
Call Service into initState with Custom Design
- Dart
@override
void initState() {
   AppSyncService.sync(
     context,
     options: {'showNativeUI': false},
     customWidget: (response) {
       return Column(
         mainAxisSize: MainAxisSize.min,
         children: [
           Text("Application Name : ${response["appName"]}"),
           Text(
             "Application Version : ${response["updateData"]["buildNumber"]}",
           ),
           const SizedBox(height: 20),
           ElevatedButton(
             onPressed: () {},
             child: const Text('Update'),
           ),
         ],
       );
     },
   );
super.initState();
}
- To display a custom alert for app updates, set
options: {'showNativeUI': false}in the sync() method. - Custom UI Requirements :
- Set
options: {'showNativeUI': false}to disable native UI. - Pass a
customWidgetparameter to define your custom alert widget. - Failing to provide
customWidgetwill result in an exception.
Run App & Verify and/or its Maintenance Services
Run your app by using code editor on Android/IOS simulators or any physical device to make sure it builds correctly.